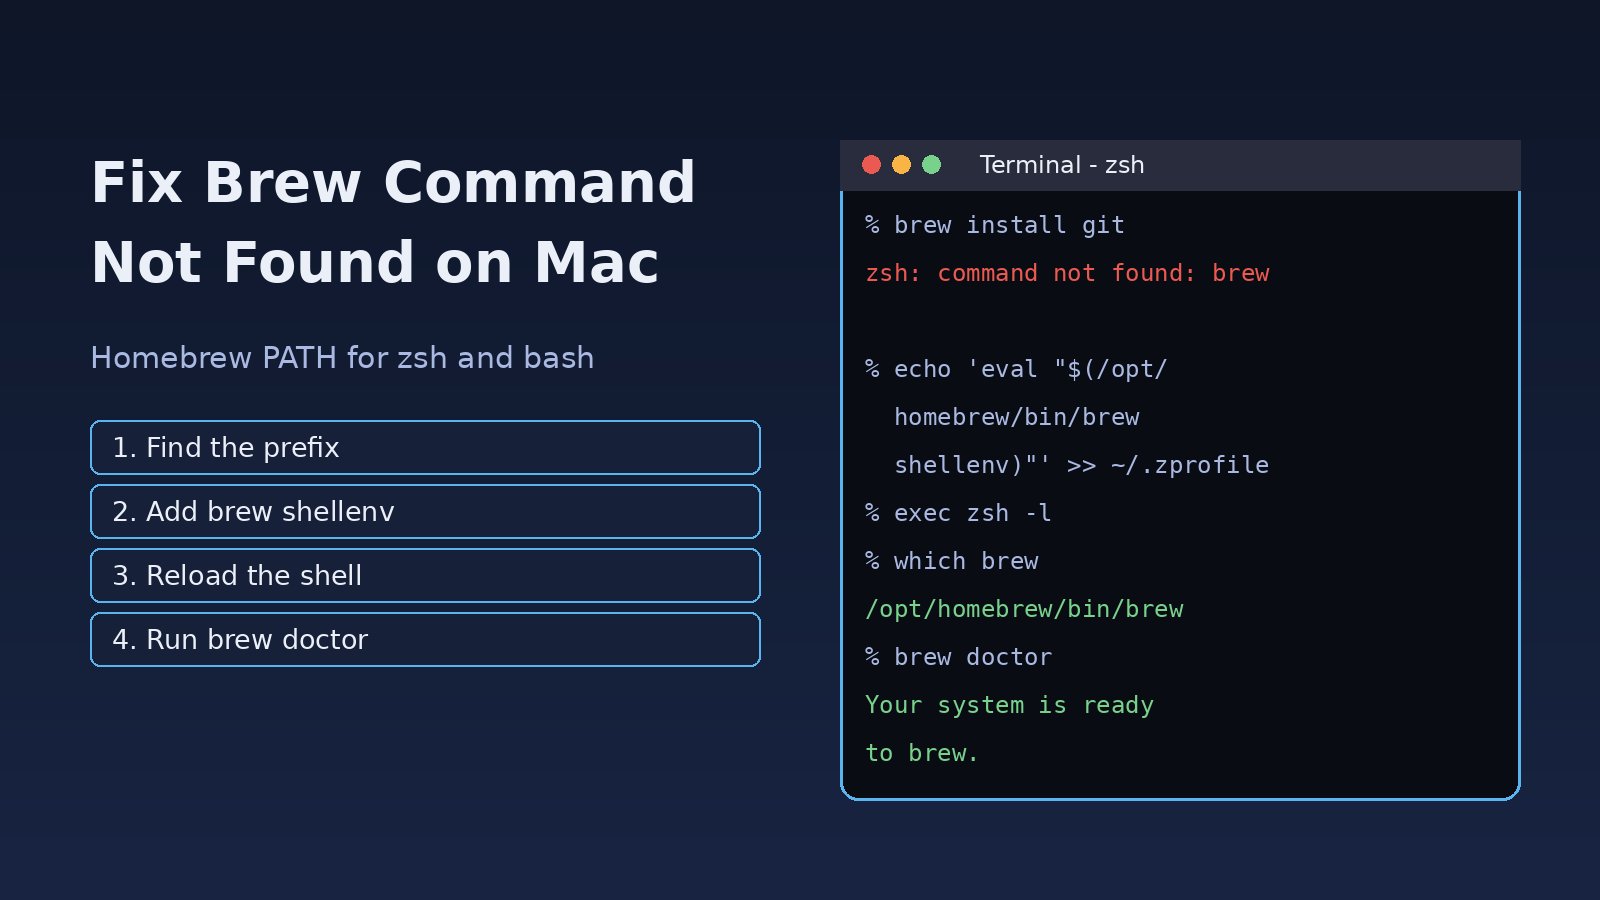
You open Terminal on your Mac, type brew install something, and get zsh: command not found: brew. The brew command not found error almost never means Homebrew is broken. In most cases Homebrew is installed but its folder is not on your shell's PATH, or the install never finished. This guide explains why it happens on Apple Silicon and Intel Macs, how to fix the Homebrew PATH for zsh and bash, how to install brew on a Mac correctly, and how to make sure the fix survives new terminal windows and restarts.
Problem: Brew Command Not Found on Mac
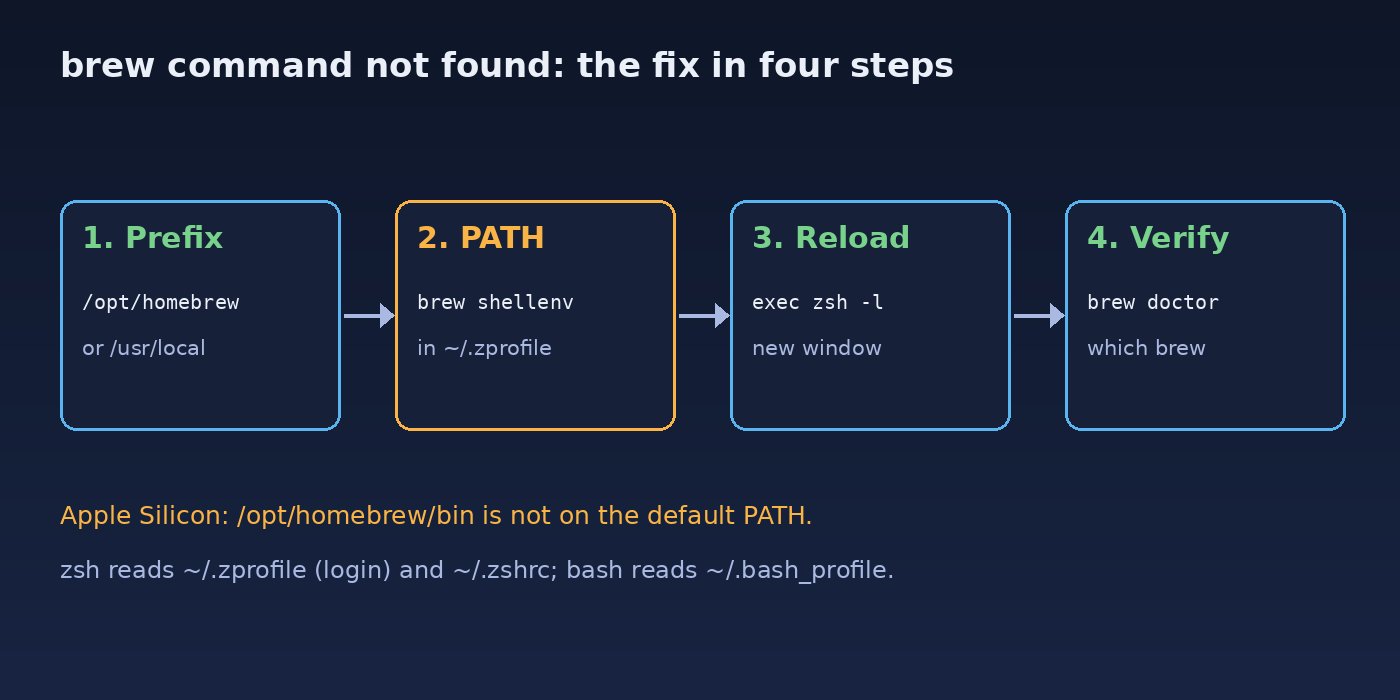
Homebrew installs into a fixed prefix and puts the brew executable in that prefix's bin folder. Your shell only finds commands that live in a folder listed in the PATH environment variable. If the Homebrew bin folder is missing from PATH, the shell reports the command as not found even though the file is sitting on disk. The default prefix depends on the Mac:
- Apple Silicon (M1, M2, M3, M4):
/opt/homebrew, so the binary is/opt/homebrew/bin/brew. - Intel Macs:
/usr/local, so the binary is/usr/local/bin/brew. - Linux (Homebrew on Linux):
/home/linuxbrew/.linuxbrew/bin/brew.
/usr/local/bin is already on the default macOS PATH, which is why Intel users rarely see this error. /opt/homebrew/bin is not, so on Apple Silicon you must add it yourself.
Symptoms
zsh: command not found: brewin the default macOS shell.-bash: brew: command not foundif you use bash.brewworks in one terminal window or app (for example Terminal) but not in another (for example the VS Code or iTerm2 terminal).- Brew worked right after installation, then stopped working after you closed the window or restarted the Mac.
- Commands installed with Homebrew, such as
node,gitorphp, are also not found or run an older system version.
Root Cause: Why the Homebrew PATH Is Missing
- The installer's "Next steps" were skipped. On Apple Silicon the install script ends with a Next steps section telling you to run two commands that add Homebrew to your
PATH. If you close the window without running them, brew is installed but invisible. - The config went into the wrong file. macOS has used zsh as the default shell since Catalina. Lines added to
~/.bash_profiledo nothing for zsh, and lines in~/.zshrcdo nothing for bash. - The command was only run in the current session. Running
eval "$(/opt/homebrew/bin/brew shellenv)"fixes the current window only. Without writing it to a startup file, it is gone in the next window. - Homebrew was never installed, or the install failed. A missing Xcode Command Line Tools install, a network error or a cancelled password prompt can stop the installer halfway.
- A Rosetta (x86_64) terminal on Apple Silicon. If Terminal is set to open using Rosetta, you may be looking for an Intel install in
/usr/localwhile Homebrew lives in/opt/homebrew, or the other way around.
Step-by-Step Solution to Fix Brew Command Not Found
Step 1: Check your shell and CPU architecture
First confirm which shell you are running and whether the terminal is native or under Rosetta:
echo $SHELL      # /bin/zsh or /bin/bash
uname -m         # arm64 = Apple Silicon native, x86_64 = Intel or Rosetta
echo $PATH
If uname -m prints x86_64 on an Apple Silicon Mac, the terminal is running under Rosetta. Open Finder, go to Applications > Utilities, select Terminal, press Cmd + I and untick Open using Rosetta, then reopen Terminal.
Step 2: Check whether Homebrew is actually installed
Look for the binary in both standard locations:
ls -l /opt/homebrew/bin/brew /usr/local/bin/brew 2>/dev/nullIf one of the paths is listed, Homebrew is installed and you only need to fix the PATH (Step 3). If nothing is listed, skip to Step 4 and install brew on your Mac.
Step 3: Add Homebrew to PATH in zsh (default shell)
The official way is brew shellenv, which prints the correct PATH, MANPATH and Homebrew variables for your prefix. Add it to ~/.zprofile, the file zsh reads for login shells, which is what Terminal opens on macOS:
# Apple Silicon
echo >> ~/.zprofile
echo 'eval "$(/opt/homebrew/bin/brew shellenv)"' >> ~/.zprofile
eval "$(/opt/homebrew/bin/brew shellenv)"

# Intel Mac (only if brew is in /usr/local but still not found)
echo 'eval "$(/usr/local/bin/brew shellenv)"' >> ~/.zprofile
eval "$(/usr/local/bin/brew shellenv)"
The last eval line applies the change to the current window so you do not need to reopen it. Some editors open non-login interactive shells that read ~/.zshrc instead. If brew still fails inside VS Code or another IDE terminal, add the same eval line to ~/.zshrc as well.
Step 4: Install brew on Mac if it is missing
Homebrew needs the Xcode Command Line Tools. Install them first, then run the official install script from brew.sh:
xcode-select --install
/bin/bash -c "$(curl -fsSL https://raw.githubusercontent.com/Homebrew/install/HEAD/install.sh)"
Enter your Mac password when asked (nothing appears as you type). Do not close the window when it finishes: read the Next steps section and run the commands it prints, which are the same as Step 3. If the script cannot run on a locked-down machine, Homebrew also publishes a .pkg installer on its GitHub releases page.
Step 5: Fix Homebrew PATH for bash
If echo $SHELL shows /bin/bash, put the line in ~/.bash_profile instead:
echo 'eval "$(/opt/homebrew/bin/brew shellenv)"' >> ~/.bash_profile
source ~/.bash_profile
To switch your account back to the macOS default shell, run chsh -s /bin/zsh and open a new window.
Step 6: Reload and check for duplicate or broken lines
Running the installer several times can leave duplicate or wrong lines in your startup files. Inspect them and remove anything pointing to a prefix that does not exist:
grep -n "brew" ~/.zprofile ~/.zshrc ~/.bash_profile 2>/dev/null
exec zsh -l      # restart the shell as a login shell
If a startup file itself fails to load because of a permissions problem, see how to fix zsh permission denied on macOS before going further.
Verification
Open a brand-new Terminal window (not the one you edited in) and run:
which brew        # /opt/homebrew/bin/brew or /usr/local/bin/brew
brew --version
brew --prefix
brew doctor       # should end with "Your system is ready to brew."
If brew doctor reports warnings, read each one; it usually tells you the exact command to run, for example fixing folder ownership or removing stray config files. Finally confirm tools installed by Homebrew take priority over the system versions with which git or which node; they should point inside the Homebrew prefix.
Prevention
- Always finish the installer's Next steps before closing the window.
- Keep PATH changes in one place:
~/.zprofilefor zsh login shells, with~/.zshrconly if your IDE needs it. - Use the
brew shellenvline rather than hard-codingexport PATH=..., so new Homebrew variables are picked up automatically. - When moving to a new Apple Silicon Mac with Migration Assistant, check for an old Intel install in
/usr/localand reinstall Homebrew natively under/opt/homebrew. - Keep your dotfiles in Git so a fresh Mac gets the same shell setup. If pushing them fails, see how to fix Git authentication failed on GitHub.
- For Node.js, consider managing versions with Node Version Manager (nvm) installed via Homebrew, and add its init lines after the brew line.
FAQs
Why does brew work right after install but not in a new terminal?
Running eval "$(/opt/homebrew/bin/brew shellenv)" only changes the current session. Write the line to ~/.zprofile (zsh) or ~/.bash_profile (bash) so every new window loads it.
Where is Homebrew installed on an M1, M2 or M3 Mac?
Native Apple Silicon installs go to /opt/homebrew. Intel installs, including ones made under Rosetta, go to /usr/local. Run brew --prefix once brew is on your PATH to see the active one.
Should I use .zshrc or .zprofile for the Homebrew PATH?
Homebrew's installer recommends ~/.zprofile, because macOS Terminal opens login shells. Add it to ~/.zshrc too only if an editor's terminal does not pick it up.
Do I need sudo to install brew on Mac?
Do not run the install script or brew commands with sudo. The installer asks for your password itself when it needs to create the prefix folder. Running brew as root causes ownership problems later.
How do I fix brew command not found in the VS Code terminal?
VS Code may start a non-login shell that reads ~/.zshrc only. Add the brew shellenv line to ~/.zshrc, then fully quit and reopen VS Code so it reloads its environment.
How do I completely reinstall Homebrew?
Run the official uninstall script from the Homebrew/install repository (uninstall.sh), remove old brew lines from your startup files, then install again with the command in Step 4.
Comments
Join the discussion. Replies load on demand, up to 5 levels.
0 threads
No comments yet
Be the first to start the conversation.